
Pangeo
About Pangeo’s Binder
Much like mybinder.org, the Pangeo’s BinderHub deployment (binder.pangeo.io) allows users to create and share custom computing environments. The main distinction between the two BinderHubs is that Pangeo’s BinderHub allows users to perform scalable computations using Dask Gateway.
For more information on the Pangeo project, check out the online documentation.
Using Pangeo’s Binder
Preparing a repository for use with a BinderHub is quite simple. There are two components
- The environment specification, typically a directory called
binderwith some configuration files (aDockerfile, a condaenvironment.yaml, …) - The content: notebooks, scripts, images, etc. that are present when the binder launches.
Users with fairly standard environment needs can focus soley on the content by using pangeo’s “default binder” repository. This is a standard environment with the most commonly-used geoscience packages.
To use this environment with your content, you need to craft a URL. https://jupyterhub.github.io/nbgitpuller/link?tab=binder&repo=https://github.com/pangeo-gallery/default-binder provides a tool for creating these URLs (select the “binder” tab). For example, to use the content from https://github.com/pangeo-data/pangeo-tutorial-gallery with the default-binder environment on pangeo’s binder:
- BinderHub URL: https://binder.pangeo.io
- Environment URL: https://github.com/pangeo-gallery/default-binder
- Content URL: https://github.com/pangeo-data/pangeo-tutorial-gallery
You might want to select a different User Interface, like JupyterLab.
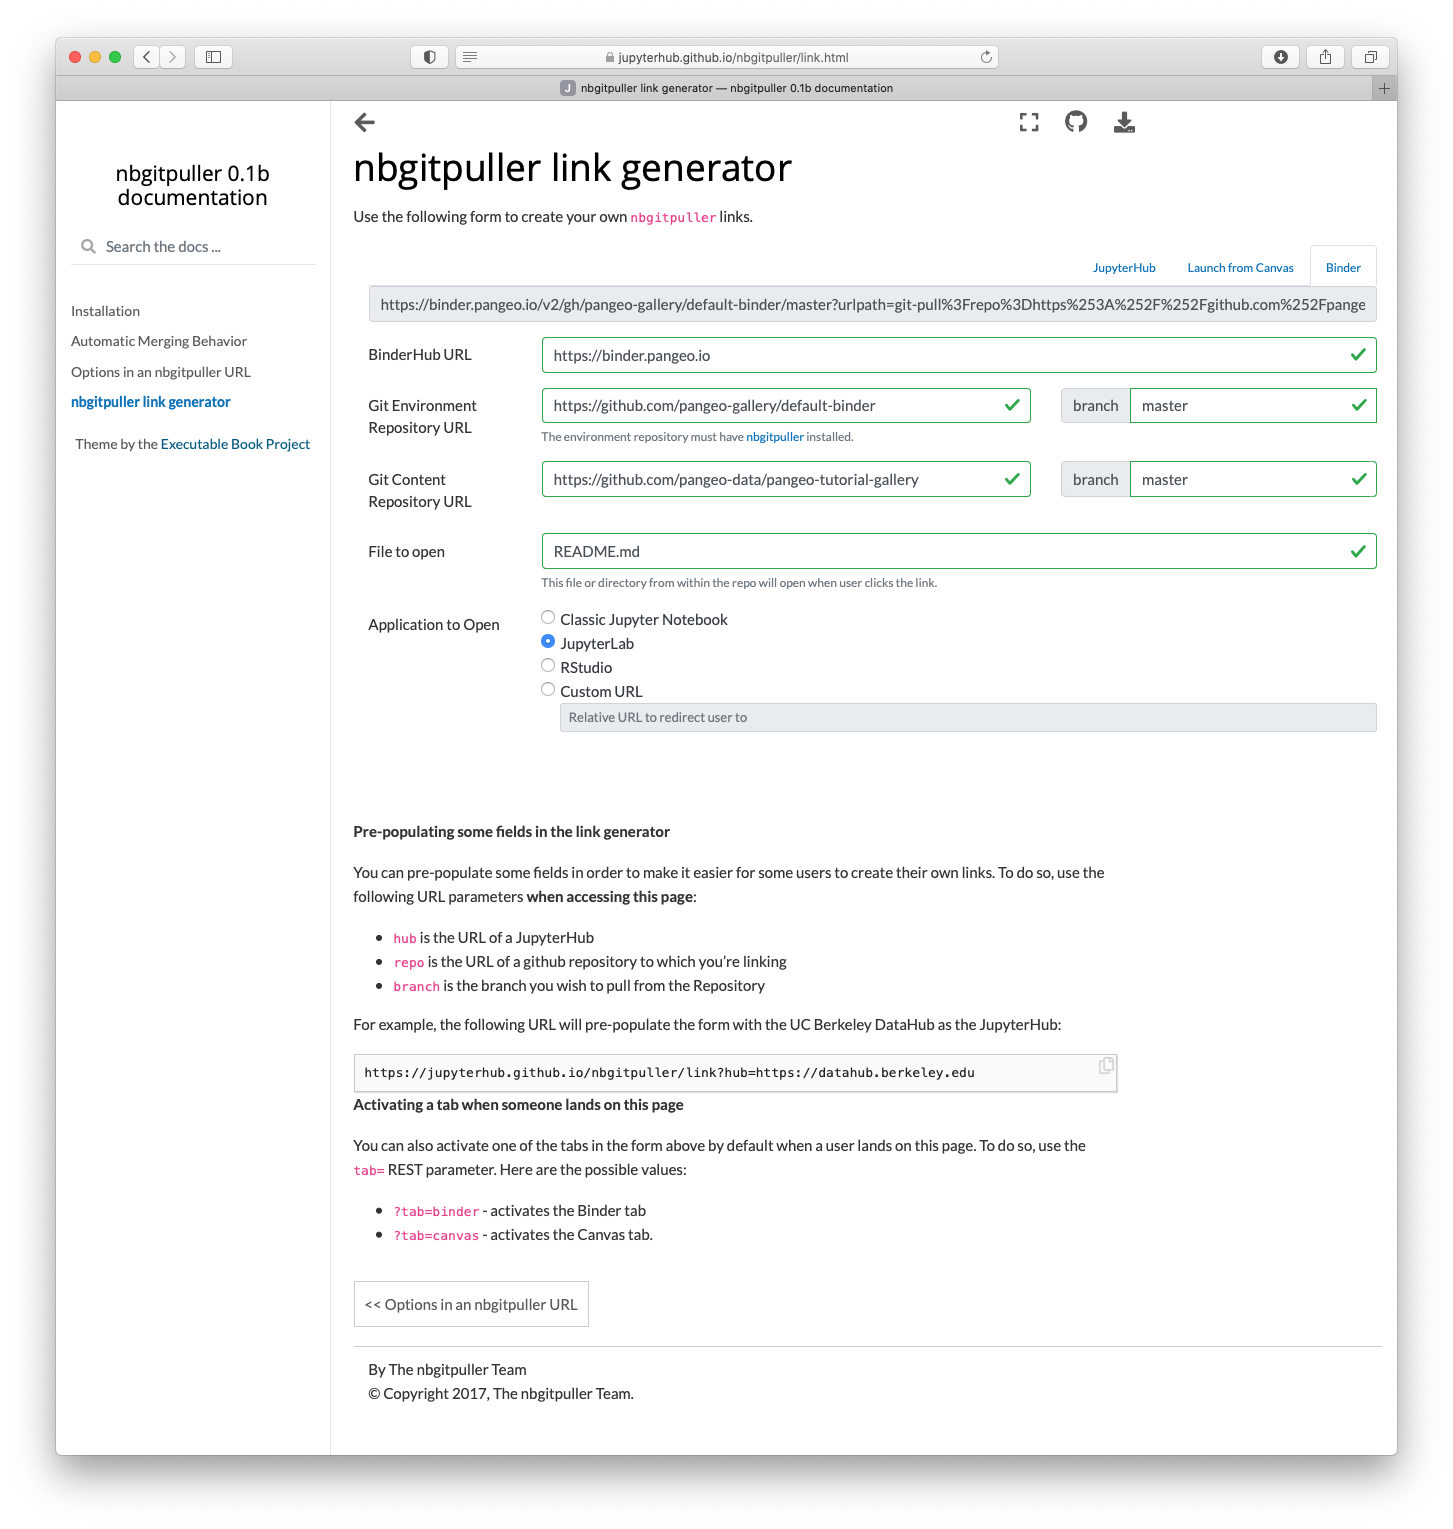
Which generates the final URL: https://binder.pangeo.io/v2/gh/pangeo-gallery/default-binder/master?urlpath=git-pull%3Frepo%3Dhttps%253A%252F%252Fgithub.com%252Fpangeo-data%252Fpangeo-tutorial-gallery%26urlpath%3Dlab%252Ftree%252Fpangeo-tutorial-gallery%252FREADME.md%26branch%3Dmaster
See https://github.com/pangeo-gallery/default-binder for more.
If pangeo’s default image isn’t sufficient, see below for building a custom
image. For more information on building custom binder images, check out the
BinderHub documentation. The sections below outline some
common configurations used on Pangeo’s BinderHub deployment. Specifically,
we’ll provide examples of the .dask/config.yaml configuration file and the
binder/start script.
Using the Pangeo-Binder Cookiecutter
We have put together a cookiecutter repo to help setup binder repositories that can take advantage of Pangeo. This automates the setup of some of the configuration (described in detail below). The usage for this tool is described below.
pip install -U cookiecutter
cookiecutter https://github.com/pangeo-data/cookiecutter-pangeo-binder.git
After running the cookiecutter command, simply follow the command line instructions to compete setting up your repository. Add some Jupyter Notebooks, configure your environment and push the whole thing to GitHub.
Configuring Dask
The Pangeo Binder is configured to include a Dask Gateway server, which allows
users to create Dask Clusters for distributed computation. To create the clusters,
we recommend depending on the pangeo-notebook metapackage. This metapackage
brings in several dependencies including dask-gateway and dask-labextension.
# binder/environment.yml
channels:
  - conda-forge
dependencies:
  - pangeo-notebook
  # Additional packages for your analysis...
The version of dask-gateway pre-configured on the Binder must
match the dask-gateway in the environment.yml. That’s currently
dask-gateway=>0.8.0.
With Dask Gateway installed, your notebooks can create clusters:
from dask_gateway import Gateway
from dask.distributed import Client

gateway = Gateway()
cluster = gateway.new_cluster()

client = Client(cluster)
You can use dask_gateway.GatewayCluster.scale() to scale the number
of workers manually, or set the cluster to adaptive mode with
dask_gateway.GatewayCluster.adapt() to scale up and down based on
computational load.
start script
The start script (e.g. binder/start) provides a mechanism to update the
user environment at run time. The start script should look roughly like the
example below. A few key points about using the start script:
- The start script must end with the
exec "$@"line. - The start script should not do any major work (i.e. don’t download a large dataset using this script)
#!/bin/bash

# Replace DASK_DASHBOARD_URL with the proxy location
sed -i -e "s|DASK_DASHBOARD_URL|/user/${JUPYTERHUB_USER}/proxy/8787|g" binder/jupyterlab-workspace.json
# Get the right workspace ID
sed -i -e "s|WORKSPACE_ID|/user/${JUPYTERHUB_USER}/lab|g" binder/jupyterlab-workspace.json

# Import the workspace into JupyterLab
jupyter lab workspaces import binder/jupyterlab-workspace.json \
  --NotebookApp.base_url=user/${JUPYTERHUB_USER}

exec "$@"